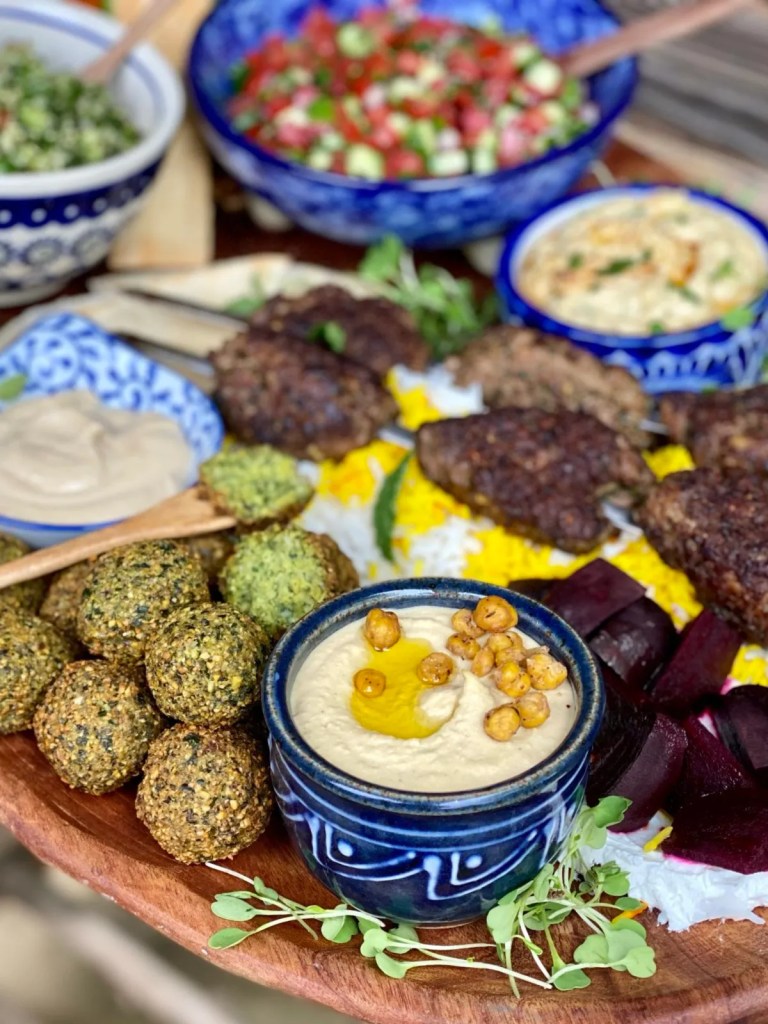
Falafel {with Lemon Tahini Sauce}
Falafel.
They are bright and green and filled with fresh herbs.
A crispy exterior with a tender moist center makes them irresistible and comfortable and oh so delicious.
These chickpea and herb fritters are a staple dish in many parts of the Eastern Mediterranean and Middle East.

I found this interesting article from History Today on the origin of Falafel.
Clearly there is much debate on which country first took claim to this dish, and it’s no wonder.
It all begins with dried chickpeas aka garbanzo beans, which need to soak overnight or for at least 8 hours. The beans are only soaked, not cooked, therefore you can’t substitute canned chickpeas. I repeat, please don’t attempt this recipe with canned chickpeas.

We are fortunate to have a sweet lunch-date spot mere minutes from our house. Jerusalem Chef is a family owned restaurant that makes authentic dishes like Jerusalem Salad, Shawarma, Kofta Kababs, Hummus, Baba Ghanoush and the most beautiful emerald green Falafel. Which are the inspiration for this post.
If you love falafel like me, you’ve likely had the really good falafel and then the kind-of-dry, not-so-tender, under seasoned variety. Clearly I aspire to share a really good falafel recipe with you, similar to the ones served at Jerusalem Chef.

So I googled “bright green falafel recipe”, clicked on Images, and found this gorgeous recipe from one of my favorite sites The View from Great Island. It’s straight forward, herb loaded, flavor packed and the finished result turned out just like the picture. Winning!
Basically your food processor does 50% of the work and you’re responsible for the rolling and frying. And 100% of the eating, although you’ll want to share the love with this one ~ your friends and family will thank you. All of the ingredients go into the food processor and you pulse until you have the consistency of coarse wet sand. You want the mixture to hold together when you squeeze it with your hand. I used a small ice cream/cookie dough scoop then gently formed them into balls with my hands. I wanted to serve the Falafel warm for dinner so I refrigerated them for a few hours before frying. You can easily make the mixture ahead and refrigerate for up to two days.

We incorporated the Falafel with Lemon Tahini Sauce as part of a gorgeous Middle Eastern Mezze Platter. We grazed our way around the board, such a fun and satisfying way to enjoy the flavors of this region.

Don’t forget to follow us @LemonyThyme on Instagram and Facebook! And check out our latest TikTok videos and Pinterest boards too!
All my best,
xo Libby

Falafel {with Lemon Tahini Sauce}
Ingredients
For the Falafel
- 3 cups soaked chickpeas not cooked
- 1/2 medium red onion
- 3 cloves garlic
- 1 small jalapeno
- 1 packed cup fresh parsley leaves stems discarded
- 1 packed cup fresh cilantro leaves stems discarded
- zest of 1 lemon
- 2 Tablespoons lemon juice
- 1 Tablespoon coriander
- 1 Tablespoon cumin
- 2 teaspoons salt
- 1/2 teaspoon baking powder
- 3 Tablespoons chickpea flour (or all-purpose)
For the Lemon Tahini Sauce
- 1/2 cup tahini (sesame seed paste)
- 1 Tablespoon lemon juice
- water to thin to desired consistency
- salt to taste
- ground cumin to taste
Instructions
For the Falafel
- Soak the dried chickpeas overnight or for at least 8 hours. DO NOT COOK THEM.
- Measure out 3 cups of soaked chickpeas and place in food processor with remaining Falafel ingredients. Run processor until you have a wet corse sand like consistency, scraping down the sides of the bowl several times during the process. The mixture should hold together when squeezed in your hand.
- Use a ice cream scoop or spoon to portion out the falafel mixture. Use your hands to gently shape into balls. Refrigerate until ready to fry, up to two days.
- Preheat vegetable oil to 350° F. Gently fry falafel in small batches and drain on paper towels. Serve warm with Tahini Sauce.
For the Lemon Tahini Sauce
- Whisk together the tahini and lemon juice, adding water to thin it to desired consistency. Season with salt and cumin to taste.


3 Comments
Sarah Phairoj
I love your beautiful step by step photos! All foods with dipping = yum!
libby
Thank you!!